Organize and Rename PDF Files Based on Content with OCR
Managing large numbers of PDF files can become a tedious task, especially when you’re dealing with scanned documents. Renaming files, creating directories, and organizing them based on their content is often a manual process that can take hours. Fortunately, our tool simplifies this workflow with the power of Optical Character Recognition (OCR) and customizable file naming patterns.
With our tool, you can extract specific text from predefined zones in your PDFs, refine the extracted content, and automatically organize your files by renaming them and placing them in directories based on that content. Here’s how it works:
Step 1: Open Your PDF Files
Begin by adding your PDF files or images. You can select multiple files at once to process large batches efficiently, or add files later. Each file will be displayed, ready for you to define the areas from which you want to extract data.
Double click on a page to start defining OCR zones.
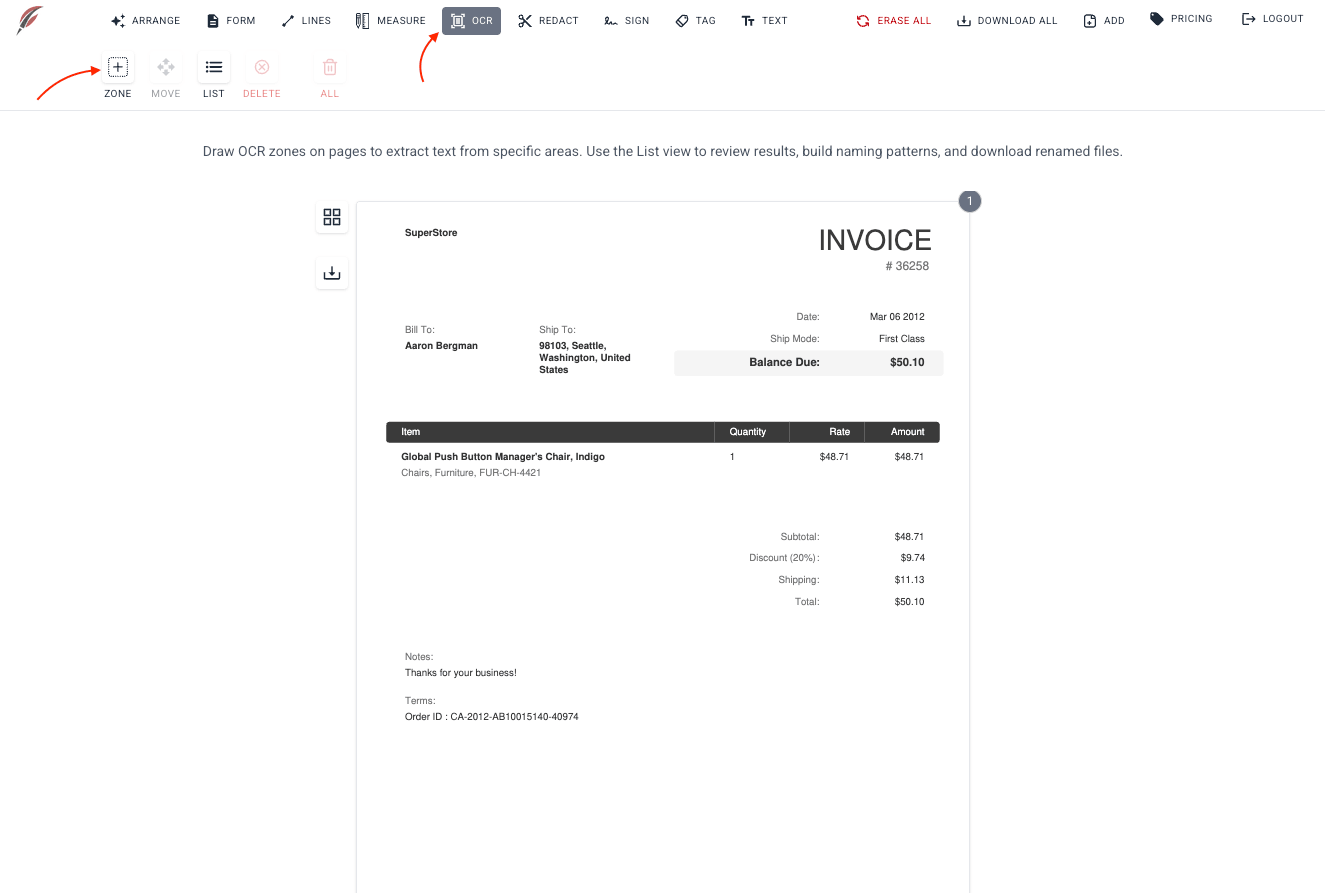
Step 2: Define OCR Zones
Once your PDF files are loaded, the next step is to define the OCR zones. These zones are areas on each page from which the tool will extract text. You can add, delete and move the selection boxes over the content you want to capture.
This is particularly useful for extracting consistent data like invoice numbers, dates, or names, which appear in predictable locations on multiple pages.
Define zones for each page individually, or clone already defined zones to multiple pages (see next step).

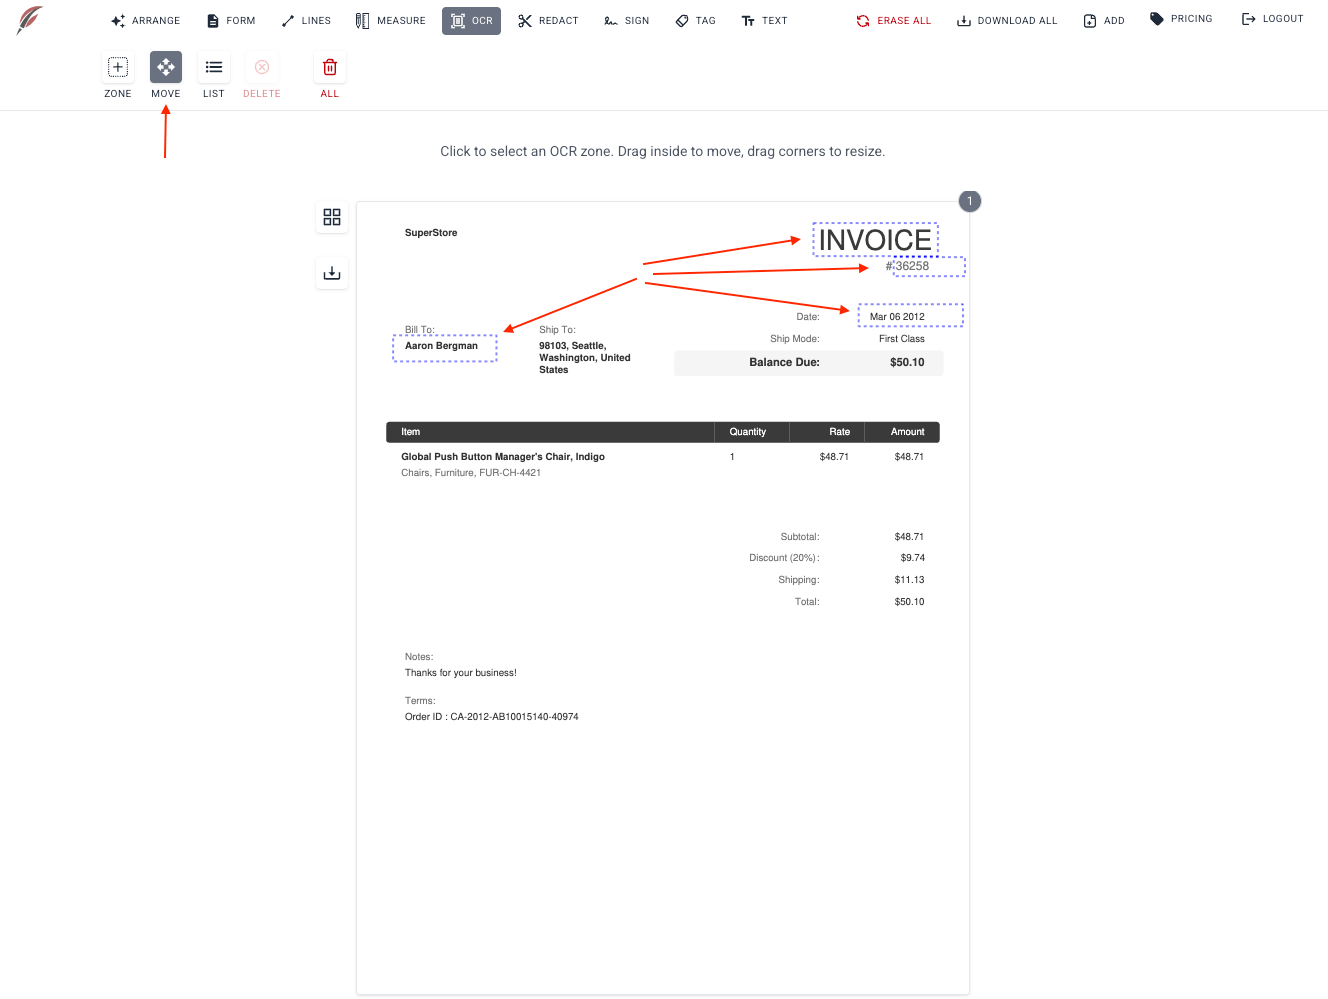
Step 3: Move And Copy Zones Across Pages
To save time, our tool allows you to copy OCR zones from one page to another. If your document has a consistent layout, you can apply the same zones across multiple pages in a few clicks, ensuring that the right content is captured from every page. Use MOVE tool to adjust and copy zones (double click on a zone to copy it to other pages).
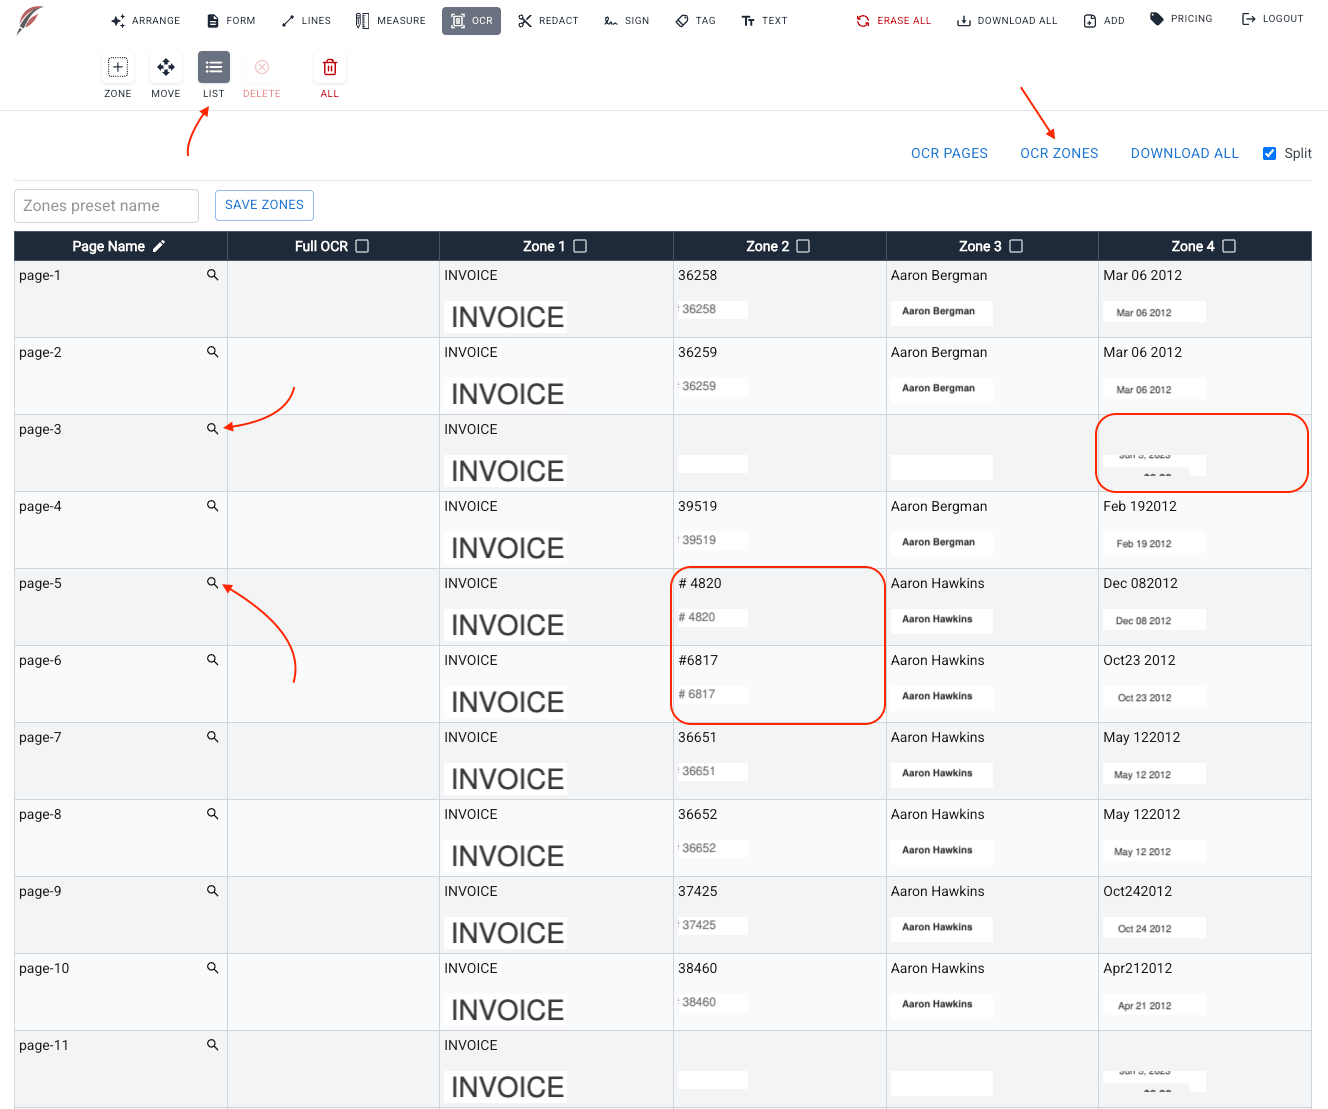
Step 4: OCR the Zones
Now it’s time to extract the data from the document. Click the LIST tool and then OCR ZONES.
Depending on the number of pages and zones It may take some time to complete the process.
Once the process is complete, you can fine tune the OCR-ed text (next step).
Step 5: Adjust the Zones
It may be necessary to adjust the zones and re-run OCR process. To move the zones click on the magnifying glass icon, fix the zones position and run OCR again.

Step 6: Fine-Tune the Extracted Content
Once the tool performs OCR and extracts text, you have the option to fine-tune the results manually. You can correct any inaccuracies in the OCRed content directly within the interface. This ensures that the text used for renaming and organizing your files is clean and accurate.
Click on the text to edit. Move mouse over the image left and right to adjust visibility.
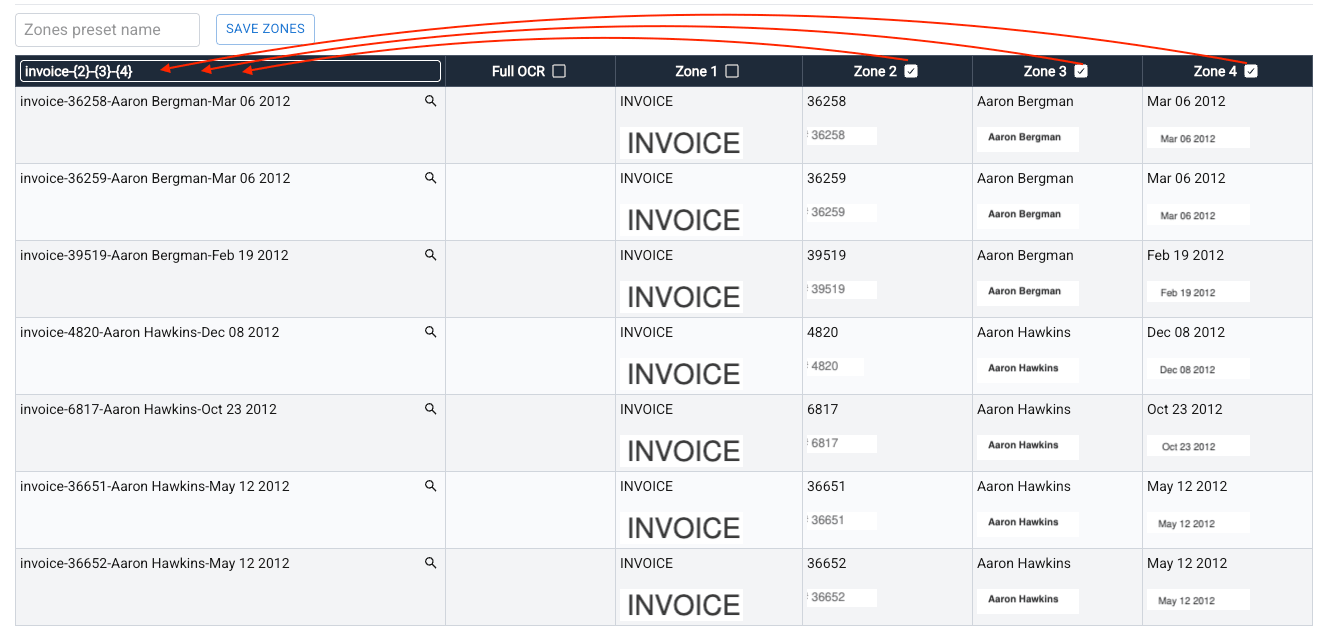
Step 7: Define the Naming Pattern
With the extracted content refined, you can now create a naming pattern for your files. This could include a combination of OCR-extracted data (such as invoice numbers, client names, or dates) and custom text. The tool lets you define complex patterns based on your specific needs, ensuring that your files are named in a way that makes sense for your workflow.
Click on the Pencil icon in the Page Name column and define the pattern manually or by clicking the checkboxes in needed Zone columns.
In this example, we defined the pattern as
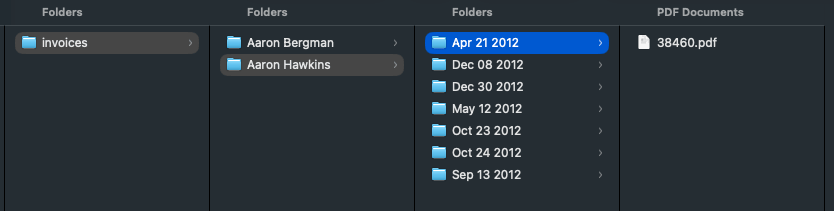
invoices/{3|”unknown”}/{4}/{2|N}
which means: create the “invoices” directory, then client name directory (zone 3) or “unknown” if the document does not contain the name, then date directory (zone 4) and, finally, give each saved PDF name equal to order number (zone 4). If zone 4 text is empty, use page number (N).
Step 8: Save the PDF files
After defining your naming pattern, click “DOWNLOAD ALL”. The tool will automatically rename the files and organize them into directories based on the extracted content. You can then download everything as a zip archive, with your documents neatly structured and ready to go.
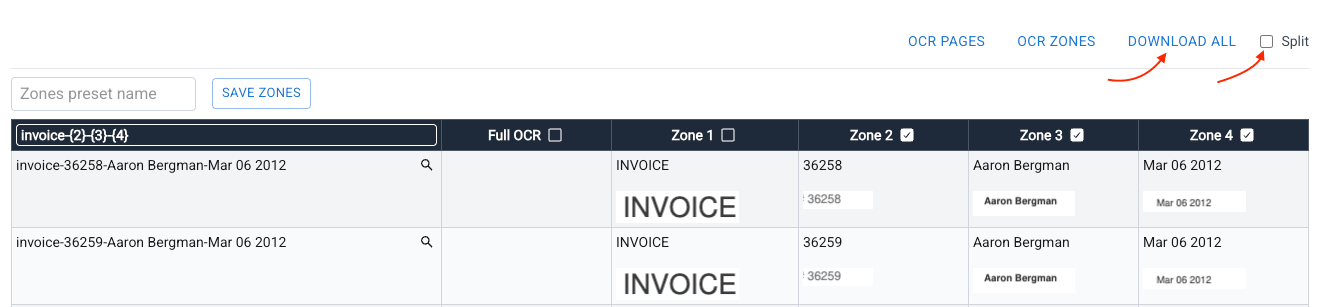
Note: If Split checkbox is not checked, DOWNLOAD ALL will attempt to combine pages from the original files and use OCR content from the first page of each file in the file name pattern. This feature can be helpful for multi-page documents, such as invoices.
Is It Safe to Organize Sensitive Documents with This Tool?
Absolutely! One of the key advantages of our tool is that everything happens directly in your browser. Unlike many other online services that require you to upload your documents to remote servers, our tool processes your PDFs locally, on your device. This means your files never leave your computer, ensuring that your private and sensitive information remains secure.
Whether you’re dealing with confidential contracts, financial documents, or personal records, you can trust that your data stays completely under your control. Since no files are uploaded or stored externally, you can organize and rename your documents without any privacy concerns. It’s the perfect solution for handling sensitive information securely.
Start Organizing Your PDFs Today!
Ready to transform how you handle large sets of PDF documents? Try our tool and experience how simple it is to define OCR zones, extract content, and organize your files. With a few quick steps, you can have a perfectly organized set of files, neatly stored in directories and named according to your preferences.